Blog

Spicy Caramel Apple Pie

Delicous caramel apple pie with all the Fall spices you love

I’ve recently been dabbling in pie making.  Because I’ve always envied after people who can make delicious AND beautiful pies.  And living in the South, I feel like it’s somewhat of a right of passage to make a good pie.  I’ll be honest, I’m not a huge pie fan.  I love me some pies with a graham cracker crust and a custard like filling, but pies with fruit and stuff in them?  Not so much.  But if I had to choose a favorite it would definitely be apple pie.  But not just any apple pie.  I like my apple pies with spice and thick sauce… the kind you can’t really slice up without making a gooey mess because let’s be honest… those taste divine.  This apple pie just happens to have a thick spicy, caramel like sauce that is just to die for!

You might want to reach for your pie pan because well… we are making a pie, right?  But trust me and reach for your handy dandy tart pan.  Think a tart pan is superfluous?  Think again.  I use mine ALL. THE. TIME.   If you don’t have a tart pan and want one, try looking at your local Goodwill or thrift store.  That’s where I found mine for a mere $2!  So grab your tart pan and about 5 apples.

DSC_0093

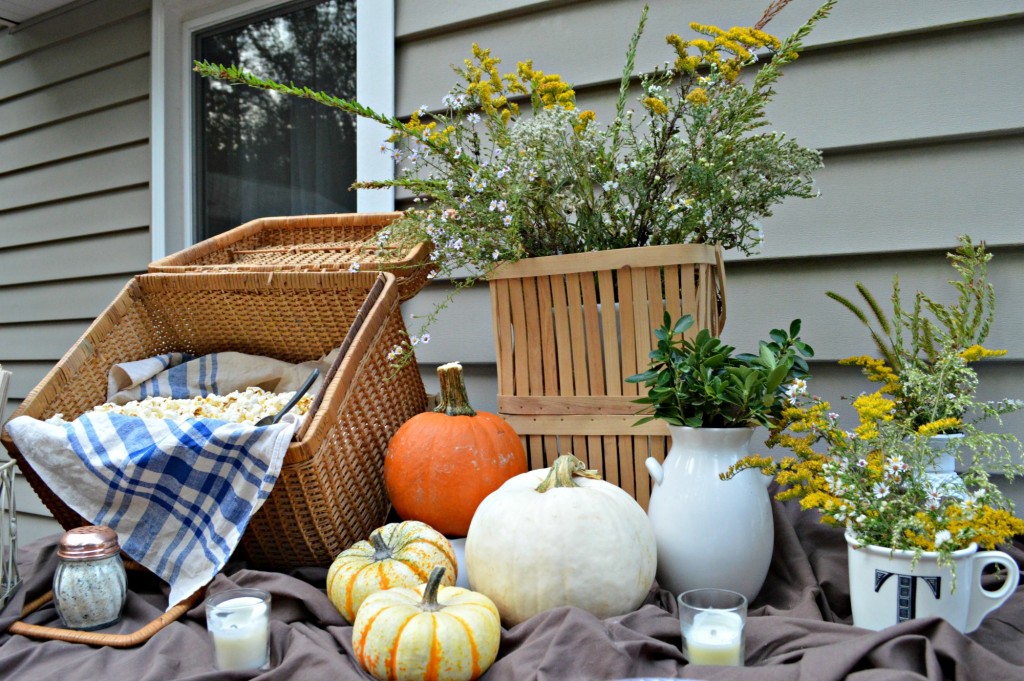
And how cool and amazing is my new cobalt cake stand made by my talented pottery making friend from Bunny Hill Studio?  Oh, my goodness, you need to must check out her etsy site.  You will want all the things.  They make fantastic Christmas presents too!

DSC_0088

And why a tart pan, you ask?  Good question!  I love using a tart pan because I love how crispy it makes the pie crust on the edges.  Crispy pie crust = good pie crust.  But you won’t ruin the pie if you use a regular old pie pan.  I’ve made it both ways, and loved it both ways.

And if you’re feeling lazy or getting the onset of “Thanksgiving overwhelmingness” (like me), you can use a little store bought help.  No shame.  But if you want a good pie crust recipe, there’s a great one here.

DSC_0100

And it took me all of 2 minutes to unroll and press into the pan.  Woo hoo! And place it in the refrigerator until you make the filling.

DSC_0106

Next, you’ll want to peel 5 apples.  Everyone has their favorite apple.  I’ve even used red delicious to make a pie *gasp*.  Here I’m using Fuji, but use whatever breed of apple that makes your heart sing.  Pink ladies, anyone?

DSC_0109

Then slice them up.  I like this handy dandy contraption.

DSC_0111

I still find the slices too thick so I slice them once more with a knife.

DSC_0113

Once the apple are all sliced up, add about 1/8 cup of sugar and mix to coat.  Then let sit for about 10-15 minutes.  This helps pull some moisture out of the apples so they don’t take a dive when baking.

DSC_0122

Now, it’s time for my favorite part: the sauce.  Add 1 and 1/2 sticks of butter to a saucepan.

DSC_0125

Then, half white sugar and half brown sugar.

DSC_0130

Now for some spice.  I like Fall spices.  A. Lot.

Cinnamon.

DSC_0134

Nutmeg.

DSC_0135

Dash of Cloves.

DSC_0136

Melt over medium low heat until all melted together and a dark caramel color.

DSC_0139

Time to assemble!

DSC_0140

Apples get dumped into the pie crust, along with the “apple juice” at the bottom of the bowl.

DSC_0141

Then the caramel sauce goes on top.

DSC_0145

DSC_0146

Place the top crust over top and press down the sides.  Pull off the excess crust.

DSC_0147

And make a pretty design on top.

DSC_0155

Top the crust with an egg wash, then place on the very bottom oven rack with a drip pan under it.
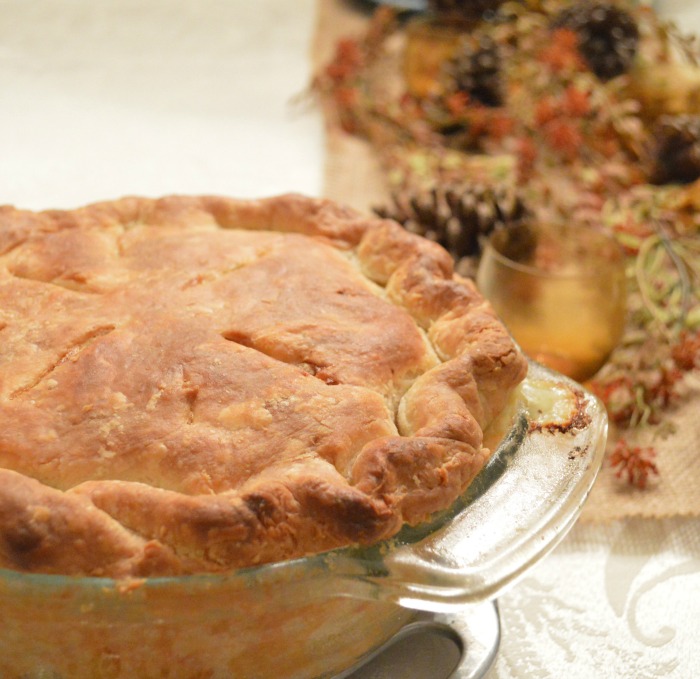
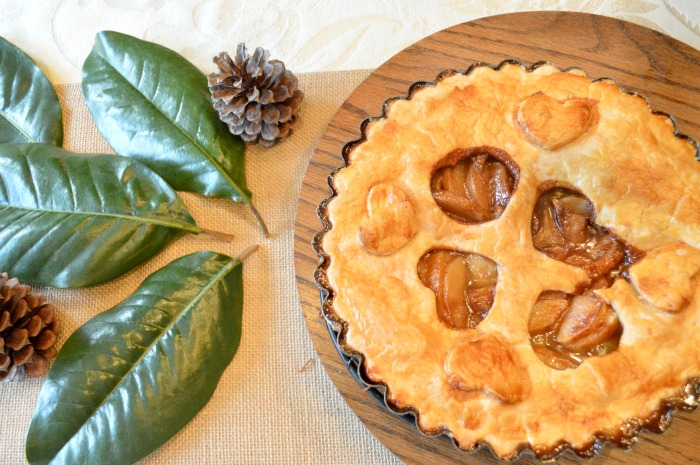
And… tada!

DSC_0165

DSC_0166

And if it’s spilling into a heap on your plate, you’ve done it right.  And don’t forget the vanilla ice cream.

DSC_0170

Spicy Caramel Apple Pie


INGREDIENTS:

2 pie crusts

5 apples, cored and peeled and sliced

1/8 cup sugar

3/4 cup butter (1-1/2 sticks)

1/2 cup sugar

1/2 cup brown sugar

1 tsp. cinnamon

1/2 tsp. nutmeg

dash of cloves

egg wash for top (1 egg beaten with water)

PREPARATION:

Peel, core, and slice 5 apples.  Mix in bowl with 1/8 cup sugar.  Let sit for about 10-15 minutes.  Press pie crust into tart pan and place in refrigerator.  In a medium saucepan, melt butter, sugars, and spices together until thick and caramel in color.  Preheat oven to 425 degrees.  Pour apples in crust in tart pan.  Pour caramel sauce over top and spread to get even.  Place second pie crust over top and press to seal.  Remove excess crust.  Make a design in the top crust or vent.  Brush egg wash over top of crust.  Place tart pan on a lipped baking sheet and place on the very bottom rack of the oven.  Bake at 425 degrees for 15 minutes, then lower oven temperature to 350 degrees and bake for another 20-30 minutes.  Let cool for at least one hour before serving.

Happiest of Thanksgivings to you and your families!

signaturetransparent

Simple Cinnamon Rolls with Maple Coffee Frosting

Simple Cinnamon Rolls with maple coffee frosting- Southern Mothers

If I had to pick one dessert…or ehem… breakfast that tops any other, it would definitely have to be cinnamon rolls.  Fresh, doughy, yeast bread encasing a succulent cinnamon sugary center, topped with delectable icing.  What more could anyone want?  If you have to breath a sigh of determination every time you make cinnamon rolls, then this recipe is for you.  And I just happened to stumble upon Everyday Cinnamon Rolls over at Our Best Bites. It’s simple, yet this is BY FAR my favorite recipe ever for cinnamon rolls, and believe me, I’ve tried them all.  So roll up your sleeves, throw on your apron and let’s make cinnamon rolls together!

I follow the recipe to a tee for the dough part, but when it comes to the filling and the icing, I stray.  I tend to do that.  So, go to Our Best Bites and make the dough, but when you’re done, come back over here, and I’ll show you how to make the filling and the frosting.

Instead of brown sugar, I like to combine brown sugar and white sugar and add a bit more cinnamon.

DSC_0740

DSC_0743

DSC_0745

Roll it up and cut ’em up, about 1 to 1-1/2 inches thick.  Plop them in a greased 9×13 pan.  And use butter! Pam will make them have crunchy bottoms…no good.

DSC_0754

The best fool proof way to make the rolls rise is stick them in an unheated oven with the light on with a dish of boiling water underneath of them.  A little trick from Marietta native, Alton Brown… who I’ve seen at Kroger! Yes, I was starstruck.  And he’s awesome.

DSC_0755

And don’t look too closely at my oven… ahem… apple pie spillage.

After about 30-40 minutes, the rolls should be nice and risen.  Immediately bake in a 350 degree oven for 15-20 minutes until golden brown.

Now, that the rolls are done, let’s make the frosting!

DSC_0783

Whip up cream cheese, melted butter, powdered sugar, syrup, and coffee until smooth and caramel in color.

DSC_0798

I like to spread the frosting on the rolls when they have cooled a bit… ‘cuz I like a big, fat layer of frosting.

DSC_0800

DSC_0814

thumbnail

Simple Cinnamon Rolls w/ Maple Coffee Frosting


ROLLS:

Everyday Cinnamon Rolls

Prep and bake also according to instructions.

FILLING:

1/2 cup butter, melted

1/2 cup sugar

1/2 cup brown sugar

2 Tbsp. cinnamon

FROSTING:

1/4 cup butter, melted

3 oz. cream cheese

3 cups powdered sugar

1/2 cup of strong coffee

2 Tbsp. pure maple syrup

Whip ingredients altogether until it becomes a thick, but spreadable icing, caramel in color.  Spread on top of cooled rolls.


Don’t be overwhelmed by cinnamon roll making anymore!

signaturetransparent


Maple Walnut Apple Crisp

Title picture Web Optimized

It just wouldn’t feel like Fall – or Thanksgiving – without something with baked apples, now would it? Sometimes though, the thought of taking the time to make a pie from scratch is a little daunting because, you know, time. This afternoon, I didn’t have a lot of time and I didn’t want a lot to clean up so I turned to one of my favorites, apple crisp. This particular apple crisp (Maple Walnut Apple Crisp, respectively), is sweetened only with maple syrup, another one of my favorite flavors that just sings “autumn.” One of the things I love about this recipe is that it’s not overly sweet. If you like things on the extreme sweet side, you can add some brown sugar – but this way it really allows the flavor of the apples, maple syrup and walnuts shine!

Gather your ingredients – apples, butter, maple syrup, cinnamon, cloves, walnuts, flour, salt and oats.

P1050299

Start with five apples. I had Gala apples today, but my favorite baking apple is the classic Granny Smith, of course.

P1050287

Peel and slice thinly, then take 1/4 cup of maple syrup and three tablespoons of butter and nuke it in the microwave til the butter is melted.

P1050301

Mix in 1/2 teaspoon of cinnamon.

P1050304

Toss over the apples to coat.

P1050306

Pour into a baking dish, pie pan, tart dish (that’s what these are called, right?) or whatever you’d like. No need to grease since you have butter on the apples.

P1050308

Now the crumble topping! Mix 1 cup of flour, 1/2 cup oats, heaping 1/2 cup walnuts, 1/2 teaspoon ground cloves, 1 teaspoon cinnamon and 1/4 teaspoon of salt.

P1050310

Melt 1/2 cup of butter into another 1/3 cup of maple syrup and mix. Oh yum.

P1050313

Crumble / spread over your apples and pop it in a 350 degree oven for 35 minutes.

P1050316

Enjoy when warm with a dollop of whipped cream and drizzle of maple syrup. And some of that extra juicy syrup at the bottom. Yes, please.

finished crisp

Apple Walnut Apple Crisp Southern Mothers

I know what I’m having for breakfast tomorrow.


Maple Walnut Apple Crisp 

5 apples, peeled and sliced

3 TBS butter

1/4 cup maple syrup

1/2 tsp cinnamon

For the Topping:

1 cup flour

1/2 cup oats

1/2 cup (heaping) chopped walnuts

1 tsp cinnamon

1/2 tsp ground cloves

1/4 tsp salt

1/2 cup melted butter

1/3 cup maple syrup

Preheat oven to 350. Peel and slice apples and toss in melted butter, syrup and cinnamon. Pour into baking dish. Mix all dry topping ingredients. Melt butter into syrup in microwave and mix with the dry ingredients til wet and crumbly.  Spread/crumble topping over apples. Bake for approximately 35 minutes until apples are tender and topping is nice and crisp. Serve warm, with whipped cream and additional syrup.

Enjoy!


signature

12 Items to Buy Second Hand

Here are 12 items that you can buy second hand to save you money and add more character to your home and wardrobe

Life can get expensive.  Filling your home and your wardrobe with pieces you love on a budget can be quite a challenge!  I have been thrifting and garage saleing my whole life…before it was cool. When my Mom had 4 little ones under 5 on my Dad’s teacher salary, she learned how to shop, thrift and garage sale like a pro!  And I’m very grateful for all the tips I’ve learned from her.  When it came to decorating and organizing my home and buying clothes for myself and my family, thrift stores are my go-to.  If you’re looking for some great thrifting tips, my sister has some great ones here.  In this article, I’ll be recommending some items to be on the look out for when you hit thrift stores, antique stores, and garage sales.

1.  Solid Wood Furniture and Shelves

DSC_0043

DSC_0051

2.  Genuine Leather

DSC_0476

3.  Unique/ Old Items

DSC_0465

4.  Baskets

DSC_0452

5.  Vintage Glassware

DSC_0493

DSC_0992

6.  Name Brand Clothing- Especially with tags on them!

DSC_0760

7.  Linen napkins

DSC_0490

8.  Books

DSC_0496

DSC_0480

DSC_0495

DSC_0481

9.  Throw pillows

DSC_0761

10.  Wall Art/ Mirrors

DSC_0497

11.  Lamps

DSC_0500

Used to be gold, navy and burgandy and I spray painted it white for a totally different look.  Added a $10 burlap shade for a total of $13.

12.  Organization Items

DSC_0504

These are the items I always look for when thrifting.  Always look for high quality, genuine leather, solid wood.  Don’t settle just because you’re at a thrift store! Happy thrifting!

signaturetransparent

Southern Chicken Pot Pie

DSC_0421

I looooooooooooovvvvvveee chicken pot pie. Like. So Much. And it can’t get more Southern than this: coming home to Mama pulling out a golden brown chicken pot pie, loaded with creamy, vegetable, chicken goodness.  I grew up with vegetable-less chicken pie because I was a silly picky eater.  We always ate it on top of rice with sides of green beans and corn.  This pot pie recipe is the love child of the traditional veggie chicken pie and my Mama’s creamy chicken pie recipe. Because I love not sticking to a recipe. And I love onions and veggies now.  Chicken Pot Pie can often vary to extremes based on your preferences.  And I’ve tried them all! Personally, I love the thick, flaky homemade pie crust.  Others like the buttery soft crescent roll type of crust.  Or maybe you’re daring and go crustless!  *gasp* And after having more than my fair share of dry chicken pot pie filling, it is time to remedy that!  No more thick, dry filling.  Only creamy, rich, satisfyingly decadent pie filling here!  No, this pie may not come out in one nice, neat slice, but I promise you won’t regret it.

Pie crust.  Let’s talk pie crust over here for a minute.  Shortening or butter?  Vinegar or not?  3-2-1 ratio or some other ratio of flour, fat, and liquid?  Pastry flour or all-purpose?  Oh, the dilemma.  So many questions!  For the flakiest, most flavorful crust… this will not fail you….

  • 3 cups of all-purpose flour, thoroughly sifted
  • 3/4 cup of butter, cold, cut into squares
  • 1/4 cup shortening, cold
  • 1 tsp. salt
  • 1 tsp. vinegar
  • 1 cup of cold water

Another trick for SUPER knock your socks off flaky crust?  Don’t go pea size with your butter chunks, go rock size.  The bigger the butter, the bigger the pockets in the crust.  Trust me on this.  I also do a combination of butter and shortening because shortening is 100% fat where butter is only 80% fat.  I like the shortening to hold everything together.  But no more than 1/4 cup because you want butter to take center stage!

Rock size butter chunks look something like this…

DSC_0340

Your dough should look something like this when it comes together.

DSC_0344

Flour counter and fold in half once, then in half again.  You want layers upon layers of butter.  Therefore, flaky.  Split in two and wrap in saran wrap and put on the top shelf of your fridge where the freezer air comes out for at least one hour.  You want these babies ice cold.

Meanwhile, you can be working on your filling.  Put a few breasts of chicken into a saucepan and generously salt and pepper.  Cover with water about 2 inches over the breasts.  Boil for about 10 minutes or until juices run clear.  SAVE the chicken water!  <–you’ll need this later.  Cool on a cutting board and chop or shred chicken into small pieces.  I do a little combination of both.  I like smaller pieces because I want every bite to have a piece of chicken in it!  Mine looks something like this, but do whatever your heart wants… this is YOUR chicken pot pie.

DSC_0369

Now, it’s time for some veg.  I’m boycotting the whole peas and corn thing.  No thank you.  I’m all about the classic mirepoix mix: onions, carrots, and celery.  That’s all you need.  No, peas!  No, corn!  Just go home.

DSC_0363

And if you happen to have a little green onions and garlic that want to come to the party, then let them.   They add a little somethin’ somethin’.

Time to pull out “Big Red” and do some sauteein’! First, melt one stick of butter in a dutch oven or stockpot.

DSC_0375

Then add your mirepoix.  Saute for about 5-10 minutes over medium high heat until tender.

DSC_0378

Add green onions and garlic and saute a few minutes more.

DSC_0382

Then add 1/4 cup of flour.

DSC_0383

And it will soak up all the butter like so.

DSC_0385

Remember that chicken water I told you to save?  Add 2 cups of that to the veggies along with 1 cup of milk and salt and pepper to taste.

DSC_0387

Time to cheat a little and add 3 heaping spoonfuls of condensed cream of chicken soup.

DSC_0391

Simmer on low until heated through and thick, then add your chopped chicken and turn off the heat.

DSC_0393

It might look like soup.  And that is GOOD.  No dry pot pie here.

Take your crusts out of the fridge and roll them out and place the bottom half in a deep 1.5 qt. round baking dish.  Fill with the pie filling.  THEN, you’ll slice some Velveeta (or any melting cheese of choice) and lay it on top.  Weird?  Yes.  Good?  Yes!  I mean who says no to cheese…

DSC_0394

Take the other half of your pie crust, roll it out and lay over the top.  Do your awesome pie magic skills and make a fancy design if you want to.  I’ll just go novice and do that classic pinch rim.

DSC_0397

Add some vents and bake in a 400 degree oven for about 40 minutes or until crust is golden brown.

Fast forward 40 minutes. *insert Jeopardy theme here*

Southern Chicken Pot Pie- flakiest crust, creamiest filling

Hello, pie.  I think I love you.

Now, let me just show you the flakiness of the crust.

DSC_0423

^ Yeah?  Yeah?  You see that?  If it goes crunch, congrats.

Let me just serve some ‘o dat up with some rice, and I’m in pure Southern comfort right there.

DSC_0434

Southern Chicken Pot Pie


INGREDIENTS:

Recipe for 2 pie crusts (see above)

2 large chicken breasts, salted and peppered, boiled and shredded

1 stick of butter (1/4 cup)

1 whole onion, chopped

2 celery stalks, chopped

1 cup of chopped carrots

3 green onions, chopped

2 garlic cloves, minced

1/4 cup flour

2 cups of water that chicken was boiled in

1 cup of milk

1 tsp. salt

1 tsp. pepper

3 heaping spoonfuls of condensed cream of chicken soup

5-6 slices of Velveeta cheese

PREPARATION:

Make pie crust and chill in refrigerator.  Put chicken breasts in saucepan and generously salt and pepper.  Pour water about 2 inches over the chicken and boil for about 10 minutes until juices run clear.  Cool chicken on a cutting board.  Once cooled, chop or shred chicken and set aside.  Preheat oven to 400 degrees.  In dutch oven or stockpot, melt 1 stick of butter.  Add chopped mirepoix mix and saute for 5-10 minutes until tender.  Add green onions and garlic and saute a minute more.  Add 1/4 cup flour and stir.  Add 2 cups of leftover water from boiling the chicken along with 1 cup of milk.  Season with salt and pepper.  Add 3 heaping large spoonfuls of cream of chicken soup.  Simmer on low for 5 minutes until heated through and thick.  Turn off heat and add chopped chicken.  Meanwhile, take crust out of fridge and roll into 2 crusts.  Place one crust on bottom of a deep 1.5 quart baking dish.  Spoon in pie filling.  Top with sliced velveeta cheese.  Then, place top of crust on pie and crimp edges and vent the top.  Bake for 40 minutes or until crust is golden brown.

***Options:  Make an egg wash for the crust by mixing one egg with a Tbsp. of water and brushing over top of pie crust and add sea salt and fresh cracked pepper!

signaturetransparent

Cream Cheese Berry Coffee Cake

Easy, beautiful Cream Cheese Coffee Cake

Something about rainy days always puts me in a baking frenzy.  And if it’s a rainy Monday, you can bet your bottom dollar, I’m in an apron, in my kitchen, whipping up something to put in the oven.

DSC_0258

I was sitting in my rain boots, sipping on coffee, when I suddenly needed to make this cream cheese berry coffee cake.

DSC_0241

Oh, how I begged my mom to make this over and over.  And when she pulled it out of the oven, it always looked like she slaved over it.  The presentation is gorgeous, but the effort is minimal.  That’s my kind of thing.  Can I get an Amen??? It’s light and biscuity, and it just sings like heaven when it melts in your mouth with the jam filling and the vanilla icing.

And when something so heavenly has basic pantry ingredients, I say yeah! baby!

DSC_0244

2 cups of Bisquick go into a large mixing bowl.  I usually make my own Bisquick.  Then cut in the cream cheese and butter.

DSC_0246

With this thingamajig.  A pastry cutter?  Whatever they are, they are brilliant, and I love mine.

DSC_0248

It should look something like this…

DSC_0249

Now, add the milk and mix until it becomes a crumbly dough ball.

DSC_0264

DSC_0266

Next, you’ll need a large cookie sheet and a rolling pin.

DSC_0268

*Interesting story about this rolling pin:  it belonged to my Great Great Grandmother and has been passed down 4 generations!  And one day, I hope to pass it on to my daughter.  They don’t make rolling pins like they used to;  this thing can do it all!

Anyways… back to coffee cake.

Gather it into a ball and shape it into a log on the cookie sheet.

DSC_0272

Dust your rolling pin with flour, and roll the dough into a rectangle.

DSC_0273

DSC_0274

Here comes the fun part.  Take a sharp knife and cut slanted strips on the two sides about 1 inch apart, leaving a long strip in the middle of the dough.

DSC_0275

It will look something like this.

DSC_0276

Next, take your jam of choice.  The original recipe calls for strawberry jam, but when you have the best homemade blackberry jam made by a friend, you always use that, of course 😉

DSC_0279

Spread the jam evenly along the middle of the dough.

DSC_0280

Then starting at the top, fold the strips over one another, moving from left to right.

DSC_0283

Then, you’ll have a lovely (looked like you slaved over it) braided coffee cake! But, easy peasy, right?!

DSC_0285

Put into a 375 degree oven and wait it out for 20 minutes.  Meanwhile, it’s time to make the icing.

Put 1 cup of powdered sugar into a bowl along with a little milk and vanilla and mix until drizzle consistency.

DSC_0295

When the coffee cake is done, it should look like a perfectly baked golden biscuit.

DSC_0293

Once the icing is mixed and the cake has cooled for about 20 minutes, it’s time to drizzle it over.

DSC_0297

DSC_0304

And then, of course, we all know the next step… cut into it and try not to eat the whole thing.

DSC_0306

Cream Cheese Berry Coffee Cake


INGREDIENTS:

FOR CAKE:

2 cups of Bisquick

1/4 cup of cold butter

3 oz. of cold cream cheese

1/4 cup of cold milk

1/2 cup of berry preserves

FOR ICING:

1 cup powdered sugar

1-2 Tbsp. milk

1/2 tsp. of vanilla

PREPARTION:

Preheat oven to 375 degrees.  Put 2 cups of Bisquick in a large mixing bowl.  Cut in the cream cheese and the butter until crumbly.  Stir in the milk.  Knead until dough forms a crumbly ball.  Place on large cookie sheet and roll into a rectangular shape about 1/4 in thick.  Using a sharp knife, make slanted cuts in 1 inch intervals down the sides of the dough, leaving a long strip in the middle.  Spread preserves down the middle of the dough.  Take the 1 inch strips and fold over the filling.  Bake for about 20 minutes until golden brown.  Meanwhile, stir powdered sugar, milk and vanilla in a small mixing bowl.  When cake has cooled about 20 minutes, drizzle icing over the top.  Cut and serve!

signaturetransparent

Thrifting Tips

Hi! I’m Caroline, Allie’s sister. She asked me the other day if I wanted to write a post about thrifting, and I said “if I have to.” I’m so excited to share some thrifting tips that always help me when I go to the thrift store for some new-to-me clothes. Thrifting to me feels like going clockwise through Publix: desserts first! It’s just the fun way to do your shopping.

ONE. Don’t expect order. Clothes shopping at a thrift store is nothing like shopping at the mall. The clothes aren’t neatly hung on same size hangers, in ascending size order, and grouped together with similar styles. You walk into the thrift store and sometimes it is just may.hem. You may find clothes that are impossibly stuffed into one aisle, or some baby leggings mixed in with the short sleeved shirts you are looking through. So basically, don’t go if your stress level is at a 2007 Britney Spears.

outfits-4

Shirt: Old Navy, thrifted for $3.00 // Sequin Leggings: H&M, thrifted for $4.00 // Shoes: Target, thrifted for $3.50 // Necklace: H&M, on sale for $1.00

outfits-5

TWO. Go when you have plenty of time to look around. Thrifting takes a lot of time! It’s not like department stores that only have a certain amount of shirts, pants, dresses, etc. each season. Thrift stores have hundreds of different brands, fits, seasons, and the list goes on and on. You need to make sure you walk in with time to look through all the unique styles that thrift stores offer. It’s like a treasure hunt! You have to search through a bunch of shirts to find the ones that you love.

THREE. Shop on Mondays. Most people do their closet cleaning and bring in their unwanted clothes over the weekend. That means, you get first pick on Monday morning when they bring our their new stock! Go early in the day to beat the crowds so you don’t have to wack someone with your purse over a dress you both reached for (kidding?). I know hell exists because of thrift store sale-day crowds (& burpees). Mondays are also one of the most common days for store sales. Sometimes stores offer 50% off your entire purchase on a certain day or at a certain time. Those days are MADNESS. But fun madness.

outfits-12 Shirt: H&M, thrifted for $2.50 // Sequin cardigan: H&M, on sale for $5.00 // High-waisted Jeans: H&M, on sale for $3.00! // Shoes: unknown brand, thrifted for $1.50 // Purse: Target, on sale for $6.50

outfits-13

FOUR. Look at the fitting room rack first thing. You aren’t going to be the only one looking for some good bargains on some nice brands!

FIVE. Pay attention to tags, sticker colors, markdowns, and coupons. Again, some stores run sales on certain tag colors, sticker colors, or have coupons for a percentage off everything you buy on a certain day of the week. Also ask at checkout if they have an email or mailing list you can join for offers.

outfits-22Shirt: Gap, thrifted for $2.00 // Coat: Old Navy, thrifted for $5.00 // Pants: H&M, thrifted years ago // Shoes: Old Navy, on sale for $3.97 (recently!) // Hat: H&M, on sale for $3.00

SIX. Snag the maybe’s. Grab those pants that you aren’t 100% sure about yet, and put them in your cart. You can always decide before you check out. You don’t want to change your “maybe” to a “yes” and go back to find that they’ve already been picked up by someone else.

SEVEN. Shop the off-seasons. Shop for winter in the summer and vice versa. You will have the most selection because no one else will be shopping for a heavy down coat in 97 degree weather or shorts when it’s below zero. These items are also more apt to being on sale since they are out of season.

outfits-20Shirt: F21, thrifted years ago // Skirt: J. Crew, thrifted for $3.00 // Cardigan: H&M, consigned for $4.00 // Shoes: Prabal Gurung, thrifted for $3.50

EIGHT. Don’t listen to your “I can alter this!” lies. Maybe this is just me, but I can’t tell you how many times I have whispered that to myself while looking at something that didn’t fit. It almost always stayed hunkered down in my closet un-altered and un-worn. I am, however, a huge fan of making something work. Pictured below: I found a blanket scarf a few weeks ago, and it can be worn as a poncho/shawl. It’s fun to get creative with your finds.

outfits-29Scarf: unknown brand, thrifted for $1.00 // Shirt: Old Navy, bought for $6.00 // Boyfriend Jeans: Gap, thrifted for $4.00 // Boots: unknown brand, consigned for $8.00 // Hat: H&M, on sale for $3.00

outfits-31

NINE. Set your expectations low. Sometimes you won’t find much or anything at all. The good thing about thrift stores is that they are always getting new stuff in! Check back in a week and you will find that they have an entirely new selection of clothes (with the exception of that denim jumper…thankfully).

TEN. Don’t go by size. Sizes are not universal unfortunately. I can wear a small in some brands, while another brand’s large fits just fine. I always look through every size at the store because of this reason. As you shop around, you will start to learn how certain brands fit and if they run big/small.

You can find some great things if you look for them. I actually have been looking for some simple, gold flatware for yeeeeeeears, and I finally found an entire set last week while thrifting! Finding good deals is second best to sitting on a cold toilet seat in public restrooms (AM.I.RIGHT.). I hope these few tips will help you and make it not so overwhelming the next time you decide to try thrifting for some clothes.

XO Caroline

There’s Always Room for S’more Love- A Baby Shower

Since when did ladies get to have all the fun at baby showers?  Per request of the soon-to-be-parents, we planned a low key backyard couples shower to welcome the new little one.  And I have to say, it was one of the most enjoyable showers I’ve ever been to… and probably the prettiest.  The deck streamed with globe lights and candles, the fire flickering, tables layered with a delectable s’mores bar and Fall treats, and chairs filled with the best of friends.

And who doesn’t love a good s’mores bar…

s'mores bar

And how cool is my friend’s deck… and greenhouse…??? So. Cool.

deck

The best part about this was getting to decorate and plan out beautiful things with my best friends.  And it all started coming together so well.  The wildflowers were indeed locally sourced (as in legally or ehem… illegally… picked from a nearby highway).

drinks

bread

creamandsugar

mallows

mallows2

popcorn

pumpkinbread

smoresbar

smoresbar2

table decor

tabledecor

But the real magic happened when the sun started going down, and the globe lights and candles came out to play…

tablescape2

mallows3

nighttime

porch

s'mores bar

tablescape

Then the guests arrived and the fun began.

Our Eagle Scout started the fire.  It wasn’t always burning since the world’s been turning.

lightingfire

The father-to-be enjoying the freshly lit fire.

fathertobe

together

The gentlemen.  Contemplating gentlemanly things.

guys

everyone

The roasting starts, and s’moregasboard commences.

frank

stew

be

smore

The lovely hostess.

bekah

The glowing mother-to-be.
mothertobe

So blessed to get to be able to celebrate these wonderful first time parents.

parentstobe

Rounding the night up with gifts, and I’d say it was a good time had by all.

gifts

Like our “s’moregasboard”?  Pin it!

signature

5 Tips for a Productive Morning

title

Mornings.  You either love ’em or hate ’em.  I tend to be more of a morning person, but how a morning goes can determine my mood for the rest of the day!  A bad morning can make you reach for your pillow and chocolate by noon begging for it to be bedtime again…  Bless it.  Here are a few tips I’ve learned that help set the mood for the rest of the day…

  1.  Get the dishes done the night before.   Oh dear, yes, this is a hard one.  I’ve been married 7 years and have been a mother for 5, and am JUST NOW learning the importance of waking up to a clean kitchen.  If I wake up to a pile of dirty dishes, I literally feel like crying even before the day starts.  NOT what I need.  And if you start with a clean kitchen in the morning, you may even have the desire to make pancakes and waffles… who knows.  Or toss cereal bowls in the general direction of your children and have a mere 5 minute clean up.  To piggyback on this, this also means starting your dishwasher the night before so you can unload them in the morning.  There is something so refreshing about having a cupboard stocked full of clean dishes and an empty dishwasher.
  2. Go to bed on time.  This may seem like a no brainer, but how hard is it, right??? My husband works long hours and oftentimes, he doesn’t get home until 8 or 9pm.  When I still have to eat and clean up from dinner and my bedtime is at 11pm…. it just doesn’t leave much room for quality time!  But one trick that my husband and I observed was when we didn’t watch shows at night, the time passed by much SLOWER! It felt like we had so much time together.  I’m not saying you should never watch TV with your husband at night, but maybe try 2 nights a week to turn off the TV and just sit and talk or play a game or have a guitar and singing jam session or whatever your interests are.  Think outside the box and change up a weeknight.
  3. Wake up BEFORE the kids.  I cannot stress how important and crucial this has been in my morning routine.  Thankfully, my kids sleep in until 8, so I can be up by 7 (6:30 if I have a run planned for that morning).  This is when I brew my coffee, make my husband’s lunch, do breakfast prep, and put away clean dishes.  Then I sit down with my coffee, plan out the day, read my morning reads, and collect my thoughts before I’m needed by 3 hungry toddlers.  If this step doesn’t happen, I hit the ground running and I feel like I’m playing catch up for the rest of the day.  Some days, I don’t get a full hour, maybe just 30 minutes or even 15 minutes makes a world of difference!
  4. Eat breakfast.  When you’re mom, you’re used to skipping breakfasts.  Most of the time, you just FORGET.  Yeah, it happens.  But by mid morning, my brain is in a fog and I feel like I need a nap already.  After fasting for 8 hours all night, your body needs something to get your blood pumping and your blood sugar up.  Mommy breakfasts are usually a bit different than what a 5 and 3 year old might eat, so a little planning goes a long way to make sure you get your stomach full and brain jump started.  Try my 3 ingredient protein smoothie that takes all of 2 minutes to make! (And it’s dairy and sugar free!)
  5. Turn off your tech.  Sometimes, this isn’t possible, but I strive to have my mornings computer free and cell phone free.  Emails, texts, facebook, and calls can wait until lunchtime.  There are some exceptions, like when I use my phone to pull up a video we need for school or to look up where a peregrine falcon lives (my 5 year old apparently wants to know this RIGHT NOW).  But ladies, Facebook… it can wait.  Focus on your kiddos.  You will be happier, they will be happier, and you can have uninterrupted time later in the day.  I have now designated “online times” for myself.  During “rest time” every afternoon, I catch up on emails, blog, do a little Facebook browsing then shut it off until my evening online time.  Believe me, a tech free morning will make you MUCH more productive!

As a mom, it’s easy to fall into survival mode.  I know, I’ve been there, and I still go there.  But these 5 tips can help you THRIVE.  The more you put these tips into practice, the easier it will become, and you will wake up looking forward to your mornings.   Take productivity into your own hands, Mama!

signature

Pumpkin Cupcakes with Cinnamon Cream Cheese Frosting

title

I step outside Monday morning with my morning coffee.  I had actually gotten dressed that morning before the kids were awake: SUCCESS.  But when I stepped outside in my jean shorts and t-shirt, I ran right back inside to grab my jeans and hoodie because y’all….. get this…. it was 59 degrees.  In August.  In Georgia.  I mean, can it get more heaven than that?!  I may be a Georgia girl, but man do I love my cold weather! I spent a full winter in South Bend, Indiana where it literally snowed every day from November to April.  So I know a harsh winter when I see one.  And Georgia, you’ve got nothin’.  But I digress.  So here I am in jeans and a hoodie, sipping my hot lukewarm coffee, in August.  Dream weather.  Suddenly, I got this hankerin’ need to make something pumpkin.  Yep, I definitely be that white girl in boots sippin’ on a pumpkin spice latte.  No shame.   I loved pumpkin before it was trendy, ok?

Anyways, I happen to have in my possession the best pumpkin bread recipe known to man.  Passed down from generation to generation.  It was a MUST HAVE on our Thanksgiving and Christmas dinner table.  This was my aunt’s specialty.  Yes, I was lucky enough to grow up just miles from ALL my aunts, uncles, and cousins.  So our holiday gatherings were 30 plus people, and let me just say, the food was “slap yo mama” good.  No joke.  My dad was the ONLY Northerner who married into our Southern family.  Everyone else has been cooking biscuits and gravy from birth.  So I don’t kid when I talk about my family’s Southern cooking.  It’s really something.  Like no-one-ate-the-whole-day-leading-up-to-it- something.

I’ve had some REALLY good pumpkin bread (um, Starbucks anyone???) and some really bad pumpkin bread.  It has a tendency to really dry out if you’re not careful.  This recipe is super easy and super fool proof.  Mix dry ingredients, mix wet ingredients, combine together and voila! Pumpkin bread… or muffins… or cupcakes.  Did I say versatile too?

pcupcake

Pumpkin Bread


INGREDIENTS:

3 cups all-purpose flour

2 cups of sugar

2 tsp. baking soda

1/2 tsp. baking powder

1 tsp. cinnamon

1 tsp. nutmeg

dash of ground cloves

1 tsp. salt

_____________________

2/3 cup vegetable oil

1 can of pumpkin or 2 cups of cooked pumpkin

3 eggs

PREPARATION:

Preheat oven to 350 degrees.  Mix all dry ingredients together.  Add wet ingredients.  Stir just until combined.

FOR BREAD:

Pour into 2- 9×5 greased loaf pans.  Sprinkle sugar/cinnamon mixture on top– or pecans or pumpkin seeds (the possibilities are endless!).  Bake @ 350 degrees for 50-60 minutes.  Cool in pans for 10 minutes, then remove to cooling racks.

FOR MUFFINS OR CUPCAKES:

Line 2-12 ct. muffin tins with paper liners.  Fill cups about 2/3 full.  Bang on counter a few times to level batter.  For muffins: top with cinnamon/sugar or nuts or seeds.  Bake @ 350 degrees for 17-19 minutes.  Until tops are springy.  Cool in pans for a few minutes, then move to cooling racks.  For cupcakes: Cool completely before frosting.


I almost forgot about the best part…. the frosting! I have a love affair with cinnamon.  My husband hates cinnamon.  Sad day.  I’ve tried just normal cream cheese frosting on pumpkin cupcakes, and it’s good.  Really good.  But this cinnamon cream cheese frosting… it’s to die for.  It just brings out the soft spiciness of the cakes, just giving an even stronger Fall flavor.  And that’s what we’re going for.  Yes.  In August.  Don’t judge.

pcupcake3

See those cinnamon specks^  YESSSSS.

Cinnamon Cream Cheese Frosting


INGREDIENTS:

8 oz. cream cheese, softened

1/2 cup vegetable shortening

1/4 cup butter, softened

2 lbs. powdered sugar

1/8 cup of milk

1 tsp. cinnamon

dash of ground cloves

PREPARATION:

Mix the cream cheese, shortening, and butter with a mixer until fluffy.  Add powdered sugar, little by little.  Add milk (if it’s too thick, add more; too thin, add more powdered sugar).  Add the cinnamon and cloves and beat until fluffy and smooth.  Top with chopped pecans.

You can either slather it on or pipe it on.  I personally love piping cupcakes more than almost anything in this world.  I used a 1M nozzle and did a rose design.  I hope to do a video tutorial on this sometime soon.

And there’s a little taste of Fall heaven in your mouth.  Enjoy!

pcupcake2

signature